> ## Documentation Index
> Fetch the complete documentation index at: https://ikun.mintlify.site/llms.txt
> Use this file to discover all available pages before exploring further.
# 使用自定义域名和 HTTPS
## 使用自定义域名
1. 在 [Route 53](https://us-east-1.console.aws.amazon.com/route53/) 注册您的域名。
2. 将域名指向负载均衡器 DNS。
### Streamlit 应用的自定义域名
在 Route53 控制台中创建一个记录,将 `app.[YOUR_DOMAIN]` 指向 Streamlit 应用。
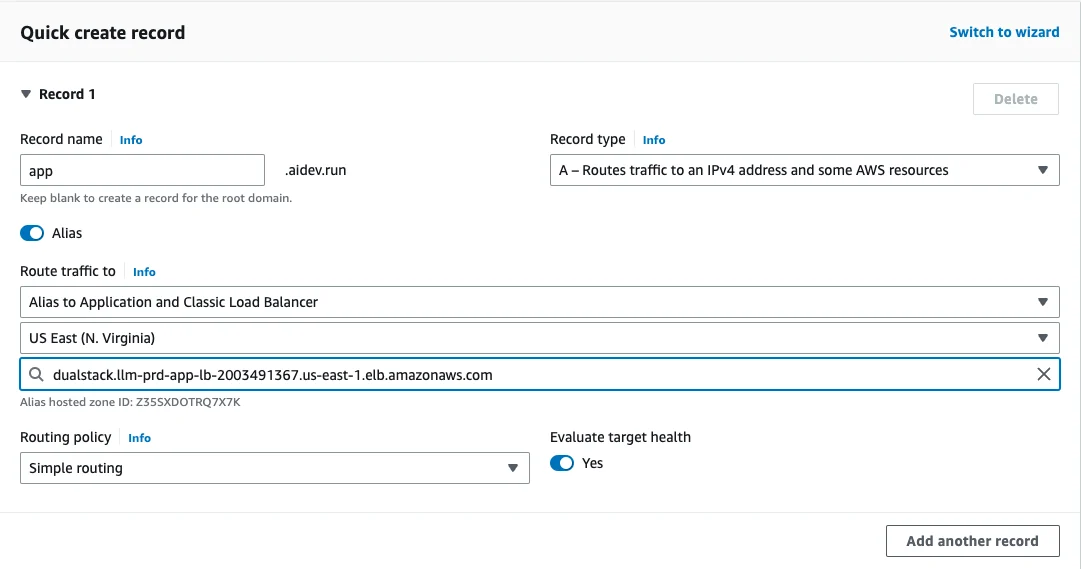 您可以通过 [http://app.aidev.run](http://app.aidev.run) 访问该应用
请注意域名中的 `http`。
### FastAPI 应用的自定义域名
在 Route53 控制台中创建一个记录,将 `api.[YOUR_DOMAIN]` 指向 FastAPI 应用。
您可以通过 [http://app.aidev.run](http://app.aidev.run) 访问该应用
请注意域名中的 `http`。
### FastAPI 应用的自定义域名
在 Route53 控制台中创建一个记录,将 `api.[YOUR_DOMAIN]` 指向 FastAPI 应用。
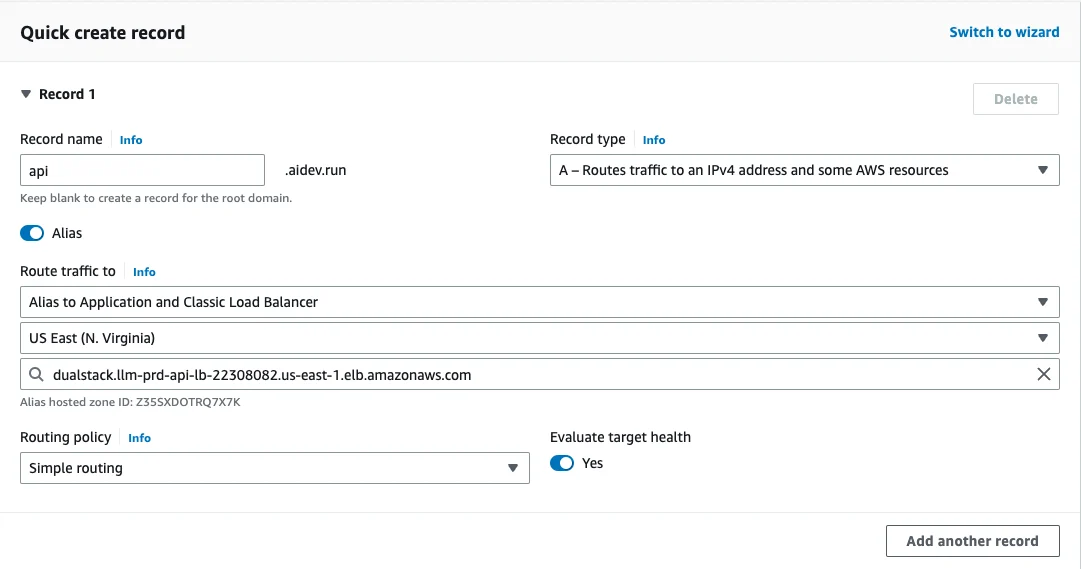 您可以通过 [http://api.aidev.run](http://api.aidev.run) 访问该 API
请注意域名中的 `http`。
## 添加 HTTPS
要添加 HTTPS:
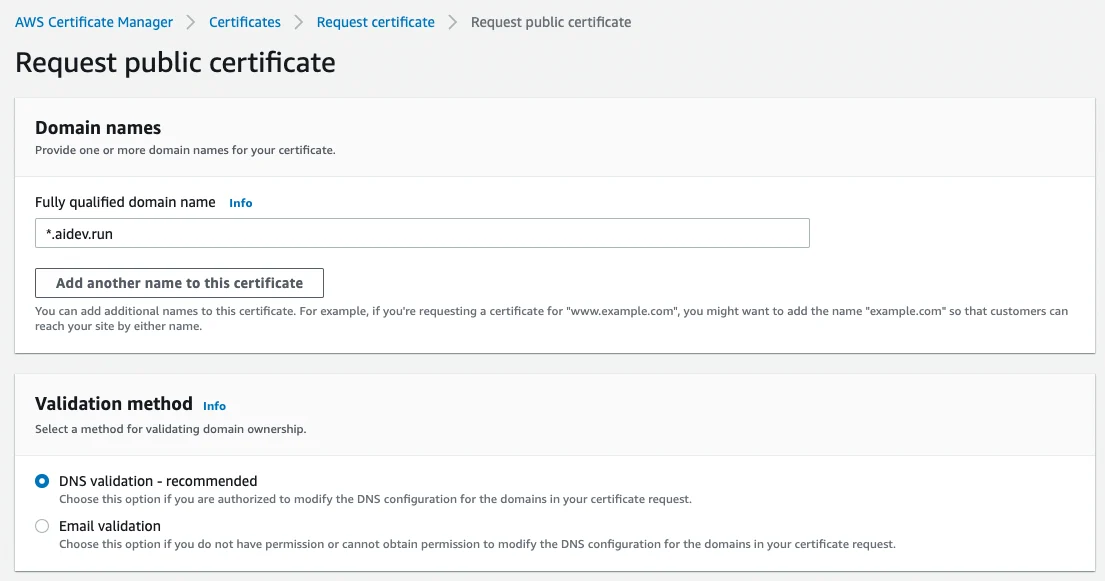
1. 使用 [AWS ACM](https://us-east-1.console.aws.amazon.com/acm) 创建证书。为 `*.[YOUR_DOMAIN]` 请求一个证书。
您可以通过 [http://api.aidev.run](http://api.aidev.run) 访问该 API
请注意域名中的 `http`。
## 添加 HTTPS
要添加 HTTPS:
1. 使用 [AWS ACM](https://us-east-1.console.aws.amazon.com/acm) 创建证书。为 `*.[YOUR_DOMAIN]` 请求一个证书。
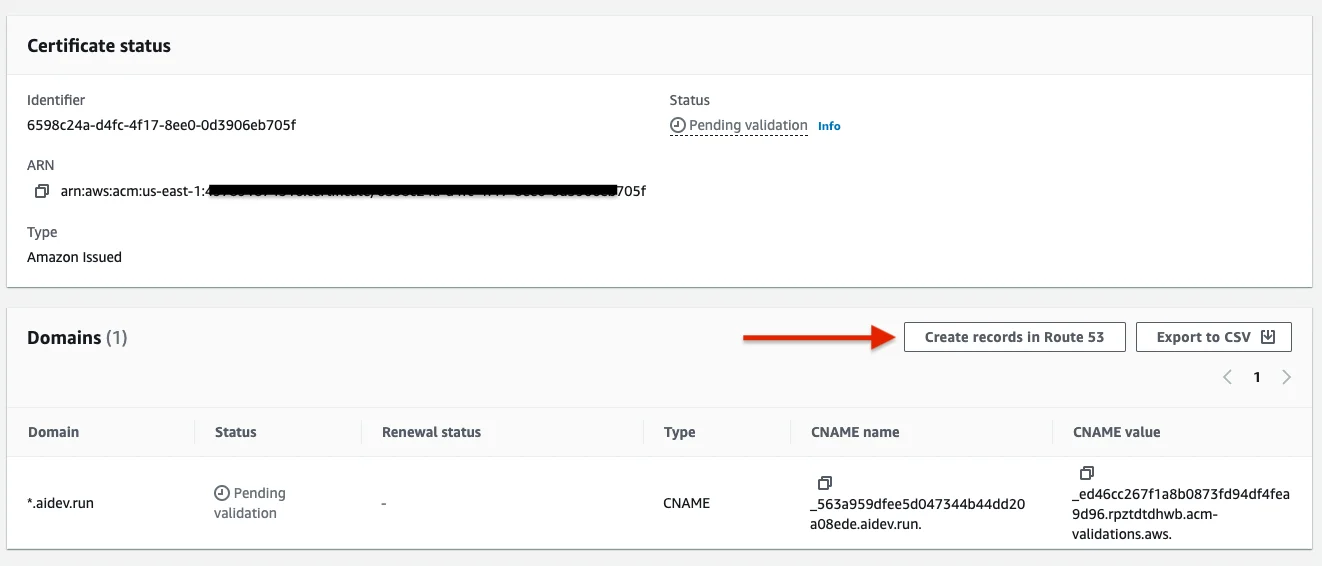
 2. 在 Route 53 中创建记录。
 3. 将证书 ARN 添加到应用。
请确保在添加到应用之前证书状态为 `Issued`。
更新 `llm-app/workspace/prd_resources.py` 文件,并将 `load_balancer_certificate_arn` 添加到 `FastAPI` 和 `Streamlit` 应用。
```python workspace/prd_resources.py theme={null}
# -*- Streamlit running on ECS
prd_streamlit = Streamlit(
...
# To enable HTTPS, create an ACM certificate and add the ARN below:
load_balancer_enable_https=True,
load_balancer_certificate_arn="arn:aws:acm:us-east-1:497891874516:certificate/6598c24a-d4fc-4f17-8ee0-0d3906eb705f",
...
)
# -*- FastAPI running on ECS
prd_fastapi = FastApi(
...
# To enable HTTPS, create an ACM certificate and add the ARN below:
load_balancer_enable_https=True,
load_balancer_certificate_arn="arn:aws:acm:us-east-1:497891874516:certificate/6598c24a-d4fc-4f17-8ee0-0d3906eb705f",
...
)
```
4. 创建新的负载均衡器监听器。
创建新的负载均衡器监听器以应用 HTTPS 配置。
```bash terminal theme={null}
ag ws up --env prd --infra aws --name listener
```
```bash shorthand theme={null}
ag ws up -e prd -i aws -n listener
```
在应用证书之前,证书状态应为 `Issued`。
完成此操作后,您的自定义域名应能正常工作使用 `https`。
5. 更新现有监听器以将 HTTP 重定向到 HTTPS。
```bash terminal theme={null}
ag ws patch --env prd --infra aws --name listener
```
```bash shorthand theme={null}
ag ws patch -e prd -i aws -n listener
```
完成此操作后,所有 HTTP 请求都应自动重定向到 HTTPS。
3. 将证书 ARN 添加到应用。
请确保在添加到应用之前证书状态为 `Issued`。
更新 `llm-app/workspace/prd_resources.py` 文件,并将 `load_balancer_certificate_arn` 添加到 `FastAPI` 和 `Streamlit` 应用。
```python workspace/prd_resources.py theme={null}
# -*- Streamlit running on ECS
prd_streamlit = Streamlit(
...
# To enable HTTPS, create an ACM certificate and add the ARN below:
load_balancer_enable_https=True,
load_balancer_certificate_arn="arn:aws:acm:us-east-1:497891874516:certificate/6598c24a-d4fc-4f17-8ee0-0d3906eb705f",
...
)
# -*- FastAPI running on ECS
prd_fastapi = FastApi(
...
# To enable HTTPS, create an ACM certificate and add the ARN below:
load_balancer_enable_https=True,
load_balancer_certificate_arn="arn:aws:acm:us-east-1:497891874516:certificate/6598c24a-d4fc-4f17-8ee0-0d3906eb705f",
...
)
```
4. 创建新的负载均衡器监听器。
创建新的负载均衡器监听器以应用 HTTPS 配置。
```bash terminal theme={null}
ag ws up --env prd --infra aws --name listener
```
```bash shorthand theme={null}
ag ws up -e prd -i aws -n listener
```
在应用证书之前,证书状态应为 `Issued`。
完成此操作后,您的自定义域名应能正常工作使用 `https`。
5. 更新现有监听器以将 HTTP 重定向到 HTTPS。
```bash terminal theme={null}
ag ws patch --env prd --infra aws --name listener
```
```bash shorthand theme={null}
ag ws patch -e prd -i aws -n listener
```
完成此操作后,所有 HTTP 请求都应自动重定向到 HTTPS。